My Personal Networking Setup
If I have nothing to hide then I have nothing to show either
When you visit a site from your browser, there are several entities which have access to this information in one request-response cycle. Starting from the router you connect to, to the DNS resolver you use to resolve the IP Address of the site, and finally, the ISP which has access to the raw network packets (unencrypted or encrypted). They are all insecure by default and most users on the internet do not care about their privacy. ISPs can very easily profile you by the queries you do and sell that data to 3rd party Ad companies. There are still a huge number of sites on the world wide web which don’t have a basic SSL encryption turned on. Even with the HTTPS turned on your ISPs can simply see the unencrypted DNS queries and figure out the site you’re visiting. Browser fingerprinting is another well-known technique where you can be easily profiled based on the different parameters exposed by your browser and generate patterns in your browsing habits.
If you’re a human you already care about your privacy. You won’t give out your Whatsapp chats to a random stranger on the streets to read, you won’t leave the door open while bathing, you won’t leave your credit card details out in the open, you will have a closed private discussion with your second half. Everyone does care about privacy in real life and everyone should care about the same online too.
“Some” social media companies exist solely on the data you provide. They are in the business of selling data and they don’t care a bit about your privacy. Every ad company out there wants an online persona about you, to feed you “personalized” recommendations. You may argue that they are “useful” but you cannot deny the fact that they are invading your privacy. You won’t like unwanted relationship advice from your neighbour when he hears you both fighting in the middle of the night. No one likes invaders, period.
Correlation of data points is easy to do in this age of ML/AI (Malai). Re-iterating an example I read somewhere on the interwebz, say you search for a very generic term “cancer”, this alone doesn’t indicate that you have cancer but merely is suggestive of the fact that you are interested in knowing more about the disease. Now maybe a few days later you search for the phrase “buy a wig online”. These 2 search queries put together can suggest that you’ve had chemotherapy done recently. This is a piece of information you might not want to hide, but you do want to have an option right?
That’s the whole fight against companies which invade your privacy is. You have absolutely no choice. You’re devoid of any choice.
Google is your friend
You may not even realise but we’ve all been guilty of Googling some random shit for fun, googling about anxiety or depression when feeling low, how to lose weight and all such seemingly embarrassing questions and we simply confront these things to Google thinking that no one is spying on us or being judgemental of us and we’re in a safe zone. What if this “friend” is the one who’s stabbing your back. No surprises there! You don’t even know but these search engines might have already shared all such queries with several 3rd party providers and business who are on the lookout for such data.
I am scared
I hope by now you’re convinced that you want some basic privacy online. If not, stop reading here because if this didn’t persuade you enough, nothing will and the rest of the blog is pretty useless for you anyway, so thanks for stopping by!
For the rest of us folks, there are a few practical things we can immediately start which. These are the things which have very less involvement of effort but are a good kickstart.
- Use DNS over HTTPS (DoH) based resolver (personal choice: 1.1.1.1)
- Use a browser which doesn’t ship with its own god damn resolver (personal choice: Firefox)
- Use an Ad-Blocker (personal choice: uBlock Origin)
Only with the above 3 steps you’ve achieved:
- ISPs cannot see your DNS queries in plain text
- Websites cannot serve you random js code in the name of ads
- A web browser which is more focussed towards privacy in general
If you’re someone who wants to spend a bit more time (trust me it won’t take even one hour) and a bit of money (one movie ticket a month) you should host your personal VPN. VPNs are awesome because you mitigate a lot of privacy invaders and you are on an anonymous browsing mode generally. Theoretically, we have shifted the trust from the ISP to the cloud provider where VPN is hosted, yes. But as long as you’re not doing anything illegal in the eyes of the state, you should be fine.
Protip: Don’t use VPN to do something stupid. You are always trackable. The whole exercise is to not allow bad actors to access your personally identifiable information online and have a non-intrusive browsing experience. If you think by using VPNs you can get away with doing something which is illegal by your state then you’re wrong.
Tools I use#
The setup is pretty straightforward. I use Wireguard client on my MBP and an Android device to connect to the Wireguard VPN server hosted on a $5 DO droplet in Bengaluru, India. For ad-blocking, I use Pi-hole, which does DNS based ad-blocking. And finally to resolve the DNS queries I use vanilla unbound without any forwarders.
Read the following sections to know more on each of the above pieces.
Setting up wireguard VPN#
Wireguard gets all the love from me (thanks to @sarat for telling me about this). It is probably the best option out there if you’re looking to self-host a VPN. Wireguard gets a lot of things right, first being the ease of setup. Literally takes a few commands and you’re all set. Wireguard is very lightweight and consumes minimal resources. Wireguard has better encryption and is a lot faster than IPvsec or open VPN. Cloudflare’s new app Warp is also based on Wireguard. Oh, and did I mention that Wireguard seamlessly transitions when you switch networks (which happens all the time when you’re on shitty 4G network/public WiFis).
Wireguard basically has 2 parts. One is the server and the other is the client. Wireguard sits in its own separate network namespace and uses this namespace as an init namespace from where the traffic is received or sent. This namespace is now responsible for flowing your traffic to the other actual interface your network card on the device (which is probably wlan or eth).
Installing Wireguard#
$ sudo add-apt-repository ppa:wireguard/wireguard
$ sudo apt-get update
$ sudo apt-get install wireguard-dkms wireguard-tools linux-headers-$(uname -r)
Generating Public/Private key pair#
$ umask 077
$ wg genkey | tee server_private_key | wg pubkey > server_public_key
$ ls
server_private_key  server_public_key
Configuring Wireguard (server)#
$ touch /etc/wireguard/wg0.cong
$ vim /etc/wireguard/wg0.conf
# Add the following lines and modify the values
[Interface] # Configuration settings for a separate network interface
Address = 10.200.200.1/24 # You can choose any private subnet
SaveConfig = false # Wireguard can configure additional peers automatically without reloading wireguard, for some reason this didn't work well for me
PrivateKey = <redacted> # Output of the `server_private_key` generated in the above setup
ListenPort = 51820 # Default port

# Add the peers (clients which connect to the wireguard server)
[Peer]
# MBP
PublicKey = <laptop_public_key>
AllowedIPs = 10.200.200.2/32
[Peer]
# Android
PublicKey = <phone_public_key>
AllowedIPs = 10.200.200.3/32
Configuring Wireguard (client)#
-
Repeat the step of generating a Public/Private key pair. You can also take a look at Subspace which is a nice GUI tool which helps you create additional profiles for your devices where generating key/pair is not convenient like mobile phones. I didn’t get the time to set it up personally, so I generated public/private keys from my laptop itself and then configured it manually using an Android app Viscerion which is a wireguard client app.
-
For the client, your config file should look like:
[Interface]
PrivateKey = <client_private_key>
Address = 10.200.200.2/32

[Peer]
PublicKey = <server_public_key>
AllowedIPs = 0.0.0.0/0
Endpoint = <public_ip_droplet>:51820
PersistentKeepalive = 25Recap#
If you got overwhelmed at this point, let’s recap what just happened.
We have 2 config files, one for the server and one for the client which happens to be my laptop. On each of the devices, generate a public/private key pair.
On the server side, while configuring peer, give the public key of the client. On the client side, while configuring peer,give the public key of the server. This is similar to how ssh works. Wireguard uses Curve25519 crypto technique to generate a public/private key pair, which honestly looks so better than lengthy ECDSA/RSA ones :P
Now let us start the wireguard service. wireguard provides a nice wrapper wg-quick which does the following things when you start:
sudo wg-quick up wg0[#] ip link add wg0 type wireguard
[#] wg setconf wg0 /dev/fd/63
[#] ip -4 address add 10.200.200.1/24 dev wg0
[#] ip link set mtu 1420 up dev wg0You can verify a new network interface now by:
$ ip addr | grep wg0
5: wg0: <POINTOPOINT,NOARP,UP,LOWER_UP> mtu 1420 qdisc noqueue state UNKNOWN group default qlen 1000
    inet 10.200.200.1/24 scope global wg0
You can also view the wireguard connection status by:
$ sudo wg show
interface: wg0
  public key: <REDACTED>
  private key: (hidden)
  listening port: 51820

peer: <REDACTED>
  allowed ips: 10.200.200.2/32
Almost There, But Not Quite#
Turn on your wireguard client and you will notice a strange thing. At this point, you’re not able to browse the internet but you are able to connect to the wireguard server and even wireguard is acknowledging that (notice the last two lines in the following snippet):
$ sudo wg show
interface: wg0
  public key: <REDACTED>
  private key: (hidden)
  listening port: 51820

peer: <client_public_key>
  endpoint: <client_public_ip>:64882
  allowed ips: 10.200.200.2/32
  *latest handshake: 8 seconds ago*
  *transfer: 754.60 KiB received, 5.59 MiB sent*
Wireguard status shows that our client can reach the wireguard server. But still, we’re unable to browse the internet on our client.
To debug this further, let’s use tcpdump and monitor the packets coming in wg0 interface. Since tcpdump’s output can be overwhelming and contains a lot of noise, let’s filter to monitor only the ICMP packets. So we’ll be using ping from a client which is the easiest way to send ICMP packets from point A to point B.
# on wireguard client
➜  ~ ping $(curl icanhazip.com)
  % Total    % Received % Xferd  Average Speed   Time    Time     Time  Current
                                 Dload  Upload   Total   Spent    Left  Speed
100    14  100    14    0     0     16      0 --:--:-- --:--:-- --:--:--    16
PING <server_ip_redacted> (<server_ip_redacted>): 56 data bytes
64 bytes from <server_ip_redacted>: icmp_seq=0 ttl=64 time=112.126 ms
64 bytes from <server_ip_redacted>: icmp_seq=1 ttl=64 time=142.980 ms
^C
--- <server_ip_redacted> ping statistics ---
2 packets transmitted, 2 packets received, 0.0% packet loss
# on wireguard server
$ sudo tcpdump -nni wg0 -Q in icmp
tcpdump: verbose output suppressed, use -v or -vv for full protocol decode
listening on wg0, link-type RAW (Raw IP), capture size 262144 bytes
14:26:31.991498 IP 10.200.200.2 > <server_ip_redacted>: ICMP echo request, id 52630, seq 0, length 64
14:26:33.027288 IP 10.200.200.2 > <server_ip_redacted>: ICMP echo request, id 52630, seq 1, length 64Okay, this is getting interesting. wg0 is definitely receiving packets from our client. Arghhh. Now does it strike to you? Our actual network routing is through eth0 (on DO usually) and wg0 is just some interface created by Wireguard. They have no “connection” (no pun intended) between them. Let us confirm if this actually is the problem by detecting ICMP traffic on this interface(eth0) using the same command:
# on wireguard server
$ sudo tcpdump -nni eth0 -Q in icmp
tcpdump: verbose output suppressed, use -v or -vv for full protocol decode
listening on eth0, link-type RAW (Raw IP), capture size 262144 bytes
... # nothing happens even if we are sending PING from client
Wow, see? No ICMP packets received on eth0. So that indeed is the problem and we have zero’ed it down using tcpdump.
(Note to self: Learn more Linux debugging utils, these things are a godsend!)
In order to fix this, we need to do 2 things:
- IP Forwarding
$ vim /etc/sysctl.conf
# check for this line and replace the value from 0 to 1
net.ipv4.ip_forward = 1
$ sudo sysctl -p- IP Tables Rules
We need to set up NAT between eth0(could be different for you) and wg0. This can be done using iptables and wireguard actually has a nice mechanism to run custom commands using PostUp/PostDown signals.
# on wireguard server
$ vim /etc/wireguard/wg0.conf
# add these lines in [Interface] section
PostUp = iptables -A FORWARD -i wg0 -j ACCEPT; iptables -t nat -A POSTROUTING -o eth0 -j MASQUERADE; ip6tables -A FORWARD -i wg0 -j ACCEPT; ip6tables -t nat -A POSTROUTING -o eth0 -j MASQUERADE # Configure iptables to setup a NAT on eth0 and forward the packets (ipv4 and ipv6) on interface wg0 to eth0
PostDown = iptables -D FORWARD -i wg0 -j ACCEPT; iptables -t nat -D POSTROUTING -o eth0 -j MASQUERADE; ip6tables -D FORWARD -i wg0 -j ACCEPT; ip6tables -t nat -D POSTROUTING -o eth0 -j MASQUERADE # Delete the rule since when wireguard is down, wg0 doesn't exist
Now everything’s set up and we are browsing the internet privately using a VPN. Ensure that your public IP is of the VPN server when you’re browsing and it’s not leaking.
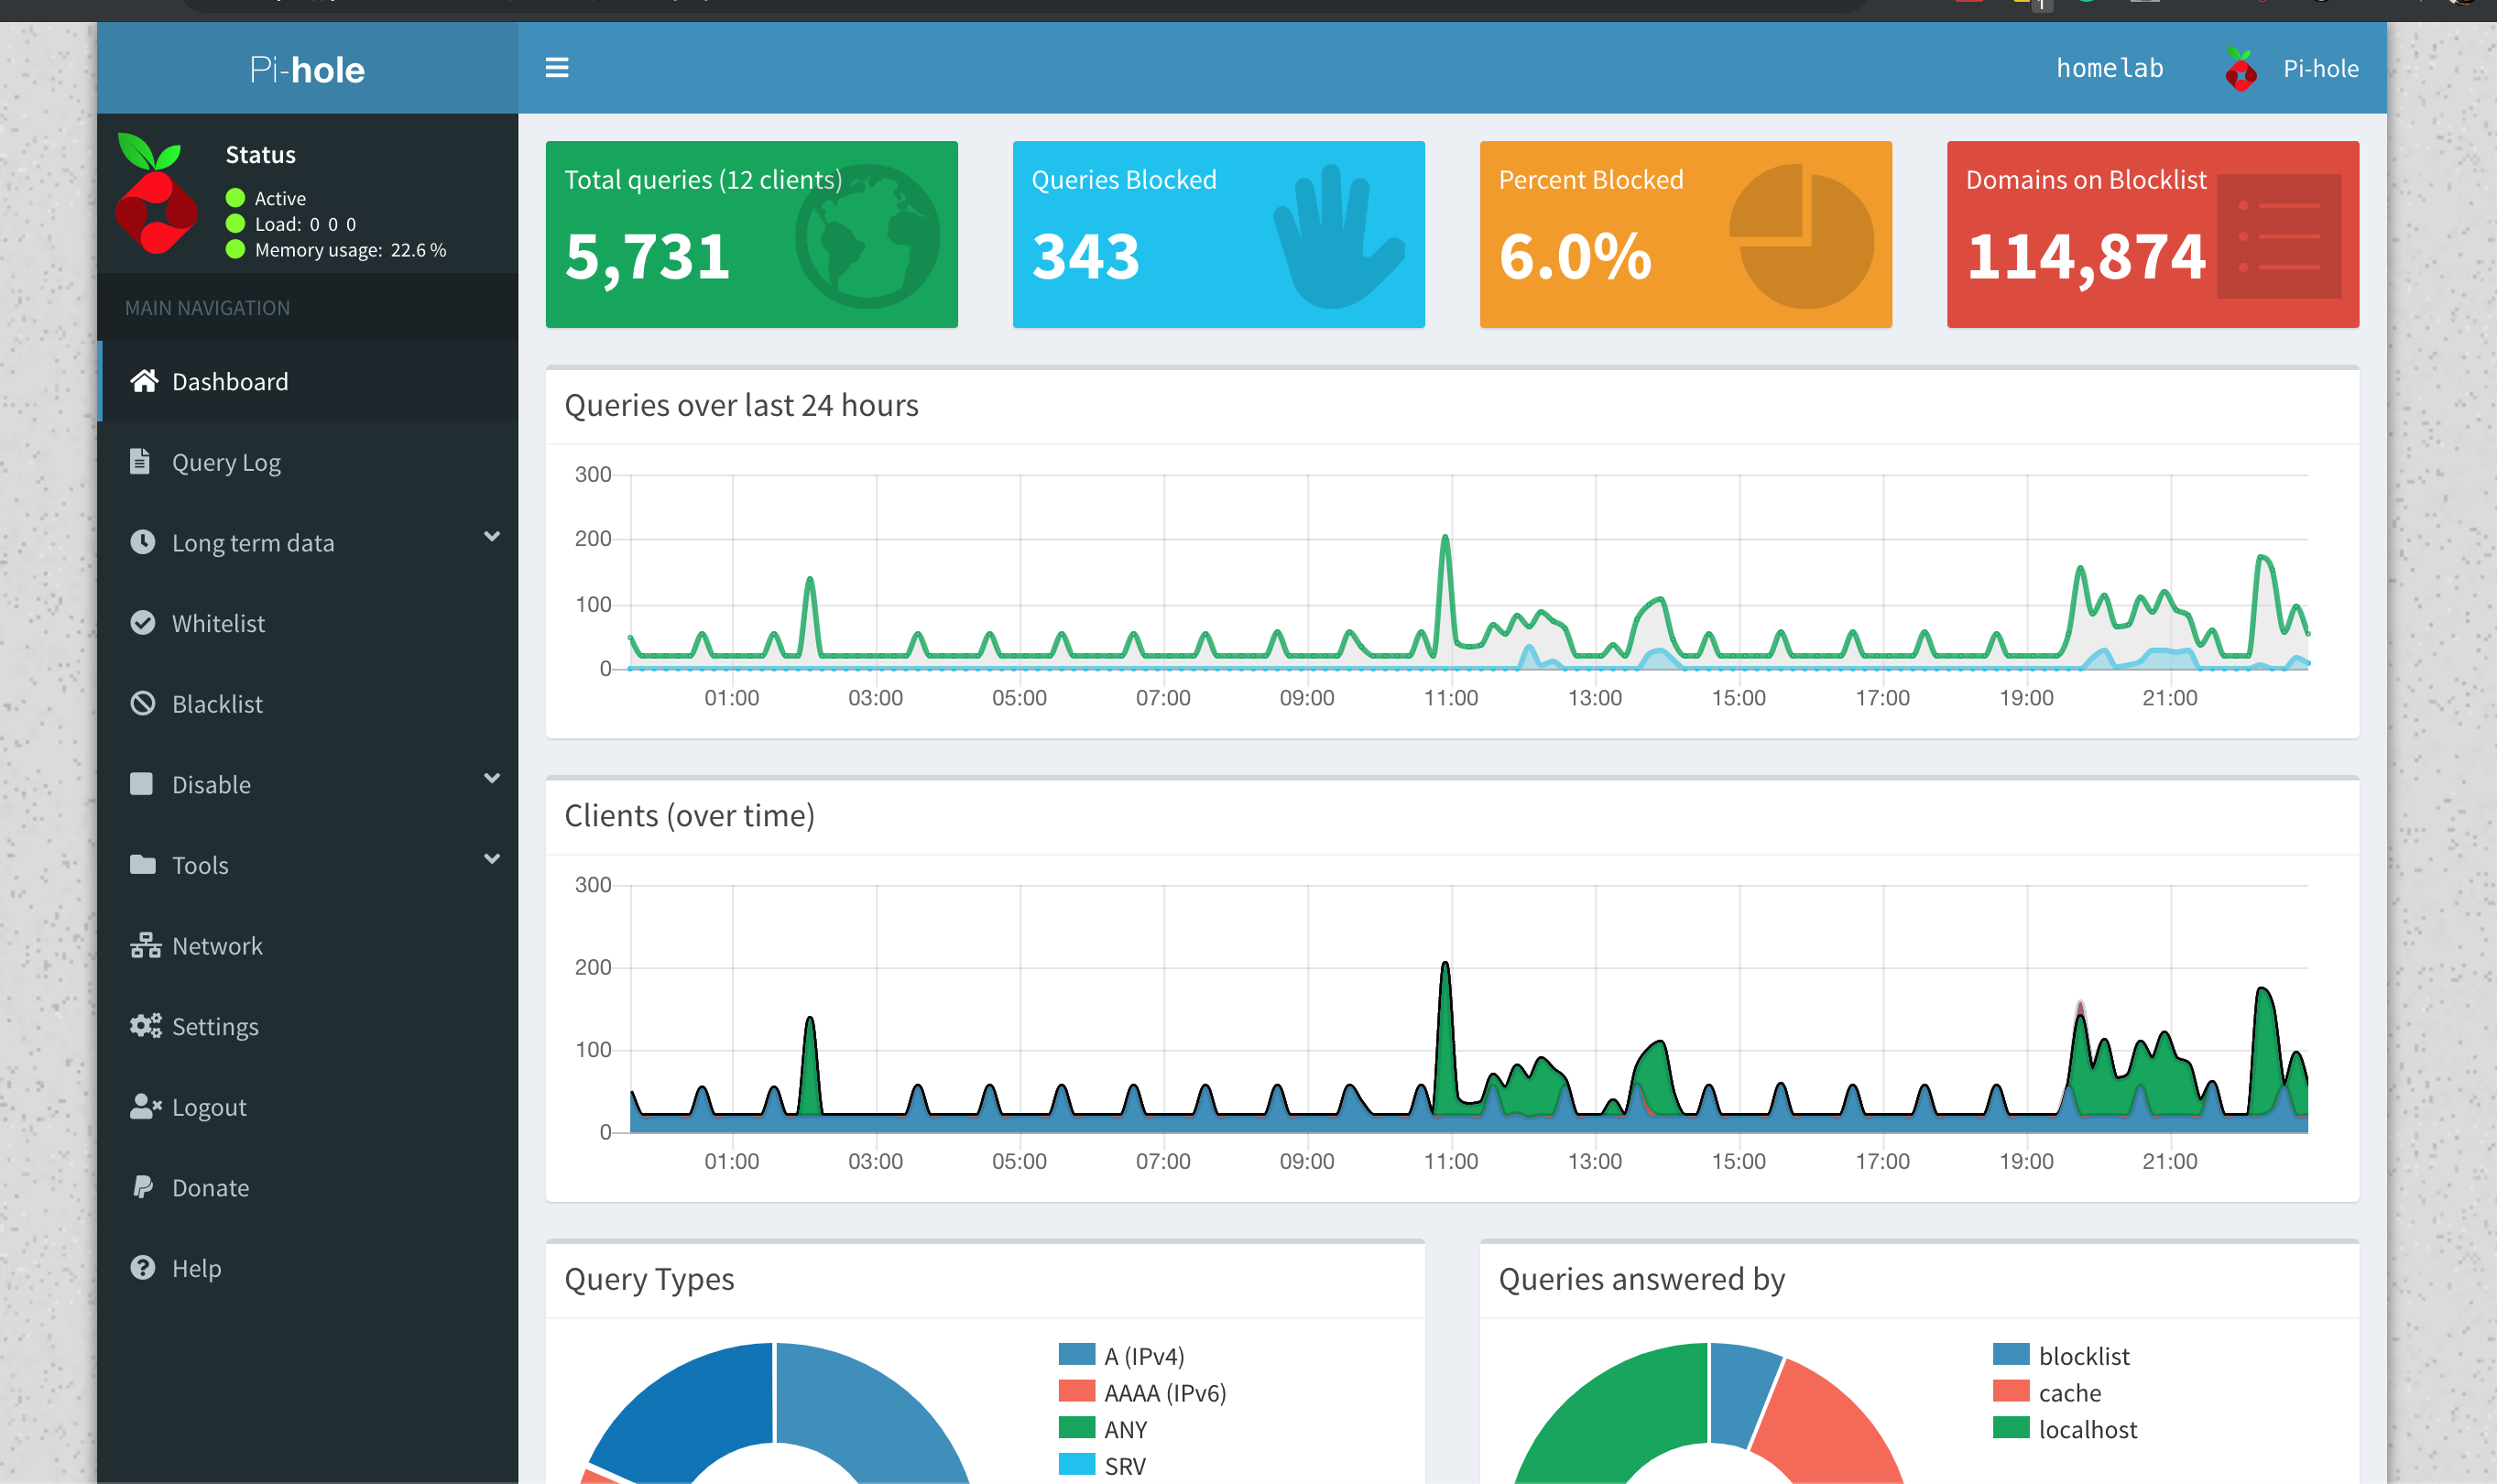
Setting up Pi-hole#
Installing Pi-hole is as simple as
curl -sSL https://install.pi-hole.net | bashYou can read more about installation in the official docs.
A nice GUI is always a plus, so make sure you enable that option while installing Pi-hole.
Now, we need to configure our Wireguard client to use Pi-hole as a nameserver for DNS resolution.
# on the client add the following line
sudo vim /etc/wireguard/wg0.conf
[Interface]
...
DNS = <vpn_server_public_ip>
...
Pi-hole runs on port 53 and accepts DNS queries over UDP. Any query is first checked by Pi-hole in the blacklist. If it’s present in the blacklist, it’s immediately dropped. If not, Pi-hole will forward our DNS query to one of the forwarder configured (1.1.1.1 for eg or our custom server, explained in the next step).
Setting up Unbound DNS#
I don’t mind trusting Cloudflare. But I simply don’t have to. :) And once you make peace with the fact that you don’t need 3rd party companies controlling your networking stack, you’ll sleep better.
I have setup Unbound without any forwarders. Unbound is a recursive resolver which supports DNSSec and caching mainly. Unbound first checks if the query exists in cache and if it does, it directly returns the “answer”. Otherwise it talks to the root nameserver and then the whole DNS dance happens. Since our DNS query is now split into multiple parts, where each nameserver is only being queried for a part of the FQDN (also known as QNAME minimialistion), it becomes a lot harder for anyone to intercept or reconstruct your DNS queries.
You can install unbound using
$ sudo apt-get install unboundTo start using Unbound, we need a file root.hints which contains information about root nameservers. You can cron this to fetch a new copy every once in 3-4 months, it hardly changes.
$ wget -O root.hints https://www.internic.net/domain/named.root
$ sudo mv root.hints /var/lib/unbound/
$ sudo service unbound restart
You can verify if the DNS queries are being resolved by:
# 6363 is where I have configured my Unbound server to listen
dig mrkaran.dev @127.0.0.1 -p 6363
Pi-hole official docs have a great explainer on how to configure Unbound with Pi-hole so I won’t be repeating the steps here again.
You can configure Pi-hole to forward accepted DNS queries from port 53 (standard) to 127.0.0.1#6363 (unbound).

The Endgame#
I plan to self-host a couple of more things. DNS is something I am really interested in and in future I plan to host my own DNScrypt server soon-ish.
I believe if you own your data you’re in better control of your digital identity. Watching too much of Black Mirror added to the paranoia to an extent, I suppose! I grew up in the late nineties and I’ve seen the internet primarily as a set of the decentralized toolchain. There’s no reason we should let go any of that to the hands of a few corp giants and make it centralized.
Ending this long-ish post by a beautiful quote:
Study after study has shown that human behaviour changes when we know we’re being watched. Under observation, we act less free, which means we effectively are less free. ― Edward Snowden
Cheers! :)