Understanding Networking in Nomad
Nomad is a general-purpose cluster orchestrator and scheduler. Up until Nomad 1.3 was released, it had no native support for discovering other applications running in the cluster. This is sort of a very elementary requirement when scheduling tasks in a cluster. Nomad relies on Consul to discover other “services” and has first class support for registering and fetching service records which makes things easier. Consul provides the records via various mechanisms such as a REST API, DNS and Consul Templates which render the exact IP/Port of the service in a Go template that can be injected into your application.
I’ve been using Nomad since quite some time (both at work and for my self hosted instance) however I’ve often tripped when it comes to Networking. Nomad has a lot of simple concepts and it all “clicks” once you understand and recognise various patterns that can be used to connect the applications. A major learning curve for someone new to Nomad and trying to integrate Consul is that the person now has to first understand how Consul works, deploy a Consul cluster and this creates a lot of friction amongst newcomers to Nomad. Nomad 1.3 solves a part of this issue (i.e. no need to run Consul for basic service discovery) and is a great fit for just getting started with Nomad based networking. However, in this post I’d like to go through all the different networking patterns I’ve known or used in production and make an attempt at simplifying these concepts for Nomad beginners.
I'll be running a single node Nomad on my dev machine. The instructions to do that can be seen here.
Scenario 1: Expose an application on the host#
We’ll start off with the simplest usecase: You have a redis container and you want to expose that to the host. The docker run equivalent to what we wanna do is:
docker run --rm -p=6379 redis:7This command exposes a dynamic port on your host. To see what exactly is the port number, you can do docker ps and find out an output similar to 0.0.0.0:49153->6379/tcp under PORTS.
To verify, I can use redis-cli to connect to this host:
$ redis-cli -p 49153
127.0.0.1:49153> ping
PONG
Fantastic! Now, let’s stop this container and see how we can do the same in Nomad.
job "redis" {
  datacenters = ["dc1"]
  type        = "service"

  group "redis" {
    count = 1

    network {
      mode = "host"
      port "redis" {
        to = 6379
      }
    }

    task "redis" {
      driver = "docker"

      config {
        image = "redis:7"
        ports = ["redis"]
      }

      resources {
        cores  = 1
        memory = 256
      }
    }
  }
}
This is a barebones definition of how to run Redis on Nomad. We’re not dealing with any volume mounts, custom config etc here - the idea is to only learn networking concepts in Nomad!
Save the above file as job.nomad and deploy to the cluster with:
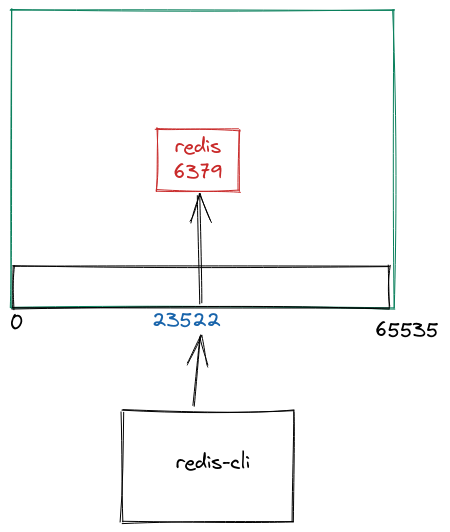
nomad run job.nomadWithin a few lines of config, we have a Docker container running, which exposes a dynamic port 23522.
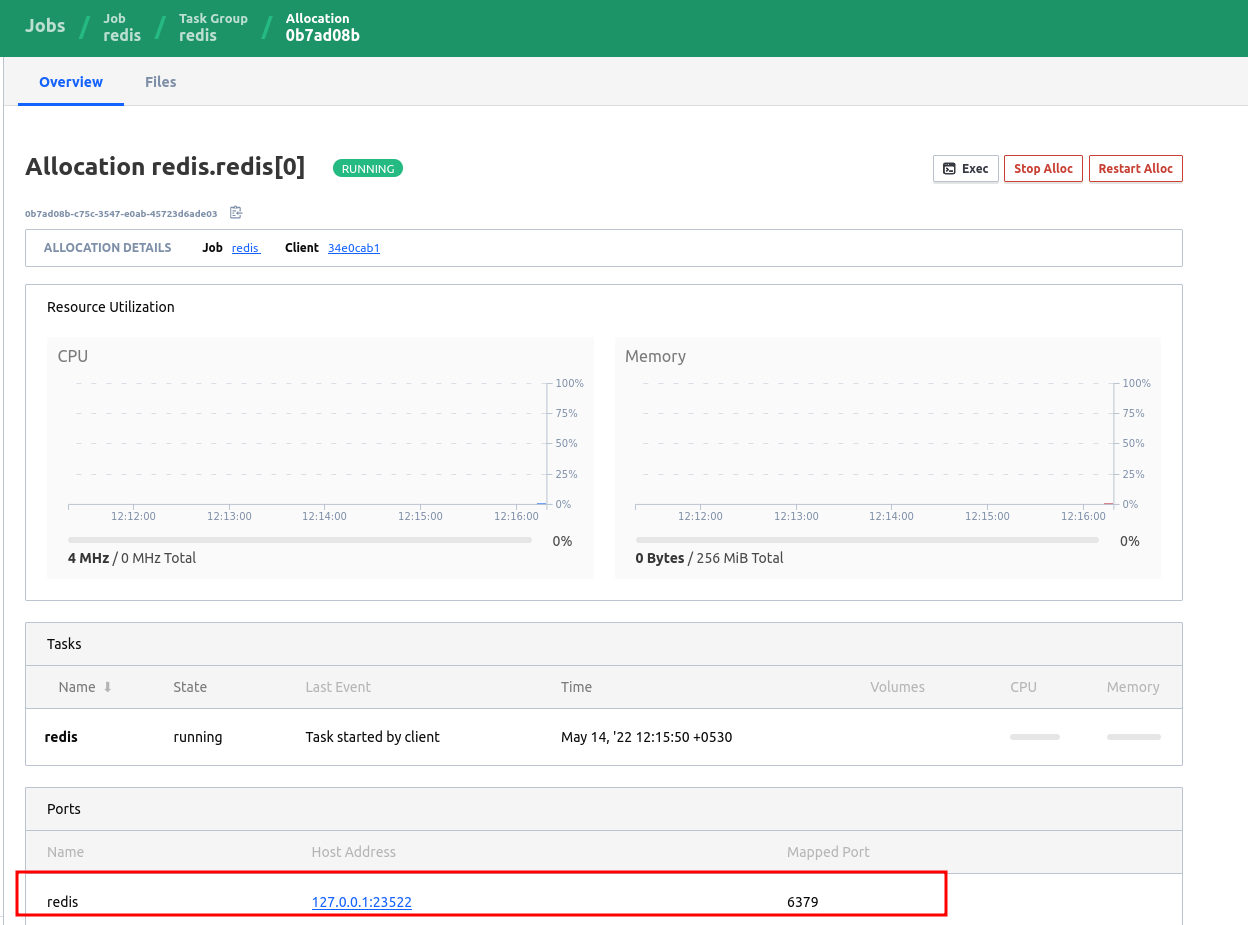
We can connect to it via redis-cli on our host:
$ redis-cli -p 23522
127.0.0.1:23522> ping
PONG
NOTE: It’s important to have ports in your task.config section. Nomad passes this information to the docker daemon running on the host. So unless you specify which ports to advertise in the container, it won’t know whether to expose 6379 or not.
This can be easily verified with docker inspect:
# without `ports`
$ docker inspect fc32a4ffd148 -f "{{json .NetworkSettings.Ports }}" | jq '.'
{
  "6379/tcp": null
}

# with `ports`
$ docker inspect 0421101d0228 -f "{{json .NetworkSettings.Ports }}" | jq '.'
{
  "6379/tcp": [
    {
      "HostIp": "127.0.0.1",
      "HostPort": "31930"
    }
  ],
  "6379/udp": [
    {
      "HostIp": "127.0.0.1",
      "HostPort": "31930"
    }
  ]
}
Exposing Static ports#
A less common scenario is to bind an application to a static port on the host. We’ll cover an example of when you want to do that a bit later, but this is generally not widely used because in a cluster your application can “float” around and the idea of sticking to a port is not useful. However, there’s a way for us to do that by simply adding a static line in our port block:
    network {
      port "redis" {
        to     = 6379
        static = 6379
      }
    }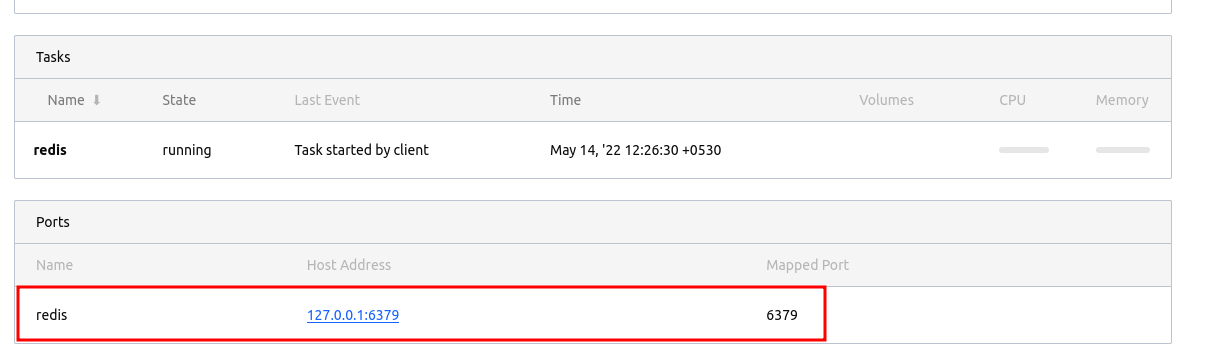
When we deploy the same file again, we can see the port allocation has changed from dynamic to the static port we assigned. It’s your job to ensure no other applications are listening on that same interface and port because that’s bound to cause conflicts.
Scenario 2: Communicate to Redis within the same group#
For this scenario, we are going to assume there’s a Go application that needs to talk to Redis. However, in this scenario, the Redis is sort of like an ephemeral cache, so it’s okay to deploy both of them in the same Task Group.
If you don't know the difference between a Task and Group, here's a very primitive explanation but please read the docs for more clarity.
A Group can contain multiple tasks. What's important to know here is that a group will always have its own shared network namespace. This means, that if you have 2 tasks in the group, they both will have access to the same network namespace. This allows both tasks to talk to each other on the same network interface.
job "hello" {
  datacenters = ["dc1"]
  type        = "service"

  group "app" {
    count = 1

    network {
      mode = "host"
      port "app" {
        to     = 8080
        static = 8080
      }
      port "redis" {
        to     = 6379
        static = 6379
      }
    }

    task "redis" {
      driver = "docker"

      config {
        network_mode = "host"
        image        = "redis:7"
        ports        = ["redis"]
      }

      resources {
        cores  = 1
        memory = 256
      }
    }


    task "app" {
      driver = "docker"
      env {
        DEMO_REDIS_ADDR = "${NOMAD_ADDR_redis}"
      }

      config {
        network_mode = "host"
        image        = "mrkaran/hello-app:1.0.0"
        ports        = ["app"]
      }

      resources {
        cores  = 1
        memory = 512
      }
    }
  }
}
Key Points:
- You can see we have defined
taskapp and taskredisunder the same group,app. This means that Nomad will co-locate both of these tasks on the same client (because they tend to share not just the same network namespace but a common allocation directory as well - which makes it super easy to share files across tasks). - We are using
NOMAD_ADDR_redisto get the IP:Port combination for theredistask. This gets injected at runtime by Nomad. You can find a list of runtime variables here. - This is ideal for quick tests/dev setup where you don’t want the overhang of Service Discovery etc and want to connect to your applications in the least friction possible.
The above config is suitable if you’re migrating from docker-compose based environments, you can use this template for your services. The biggest limitation of this approach is that it’s using a host network so it’s not possible to set up any kind of Access Controls on it. This effectively means that nothing prevents any other application on the cluster to talk to these ports.
Scenario 3: Communicate across different groups#
Task Groups are useful if you have related tasks (like the init task where you wanna fetch the files before the task starts). But a drawback of using group is that you can’t scale the tasks independently. In the above example, we placed Redis and App in the same group, but that means if you increase count of same group to scale the app, you end up scaling Redis containers too. This is undesirable as Redis may not to scale proportionally to app.
The way to do create multiple groups is to split the tasks into their own individual groups:
job "hello" {
  datacenters = ["dc1"]
  type        = "service"

  group "app" {
    count = 1

    network {
      mode = "host"
      port "app" {
        to     = 8080
        static = 8080
      }
    }

    task "app" {
      driver = "docker"
      env {
        DEMO_REDIS_ADDR = "localhost:6379"
      }

      config {
        image = "mrkaran/hello-app:1.0.0"
        ports = ["app"]
      }

      resources {
        cores  = 1
        memory = 512
      }
    }
  }

  group "redis" {
    count = 1

    network {
      mode = "host"
      port "redis" {
        to     = 6379
        static = 6379
      }
    }

    task "redis" {
      driver = "docker"

      config {
        image = "redis:7"
        ports = ["redis"]
      }

      resources {
        cores  = 1
        memory = 256
      }
    }
  }
}
When you submit this job, you get 2 allocation IDs (each group creates one alloc). The key point here is that both of these groups have their own network namespace. So, we don’t really have any way to reach the other application (we can’t really rely on the host network, because there’s no guarantee that both of these groups will be deployed on the same node).
In the previous example, we saw how Nomad exposes runtime variables that contained information about all tasks in other groups. But now since the groups are separate, the app container has no idea about redis (or vice-versa):
env | grep NOMAD
NOMAD_REGION=global
NOMAD_CPU_LIMIT=4700
NOMAD_IP_app=127.0.0.1
NOMAD_JOB_ID=hello
NOMAD_TASK_NAME=app
NOMAD_SECRETS_DIR=/secrets
NOMAD_CPU_CORES=1
NOMAD_NAMESPACE=default
NOMAD_ALLOC_INDEX=0
NOMAD_ALLOC_DIR=/alloc
NOMAD_JOB_NAME=hello
NOMAD_HOST_IP_app=127.0.0.1
NOMAD_SHORT_ALLOC_ID=a9da72dc
NOMAD_DC=dc1
NOMAD_ALLOC_NAME=hello.app[0]
NOMAD_PORT_app=8080
NOMAD_GROUP_NAME=app
NOMAD_PARENT_CGROUP=nomad.slice
NOMAD_TASK_DIR=/local
NOMAD_HOST_PORT_app=8080
NOMAD_MEMORY_LIMIT=512
NOMAD_ADDR_app=127.0.0.1:8080
NOMAD_ALLOC_PORT_app=8080
NOMAD_ALLOC_ID=a9da72dc-94fc-6315-bb37-63cbeef153b9
NOMAD_HOST_ADDR_app=127.0.0.1:8080
Service Discovery#
This is where things get interesting. The app group needs to discover redis before connecting to it. There are multiple ways to do that, but we’ll cover 2 standard ways which are more common.
Using Nomad native service discovery#
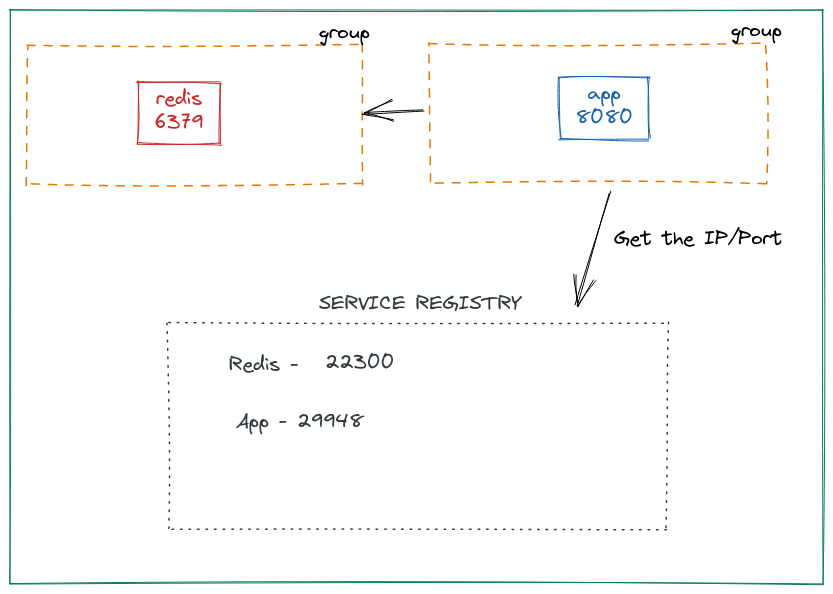
This is a feature launched in Nomad 1.3. Up until this release, Nomad had to rely on Consul for this. But with native service discovery built in Nomad, things are much simpler. Let’s make the following changes to our job file. In each group, we’ll add a service definition:
  group "app" {
    count = 1

    network {
      mode = "host"
      port "app" {
        to = 8080
      }
    }

    service {
      name     = "app"
      provider = "nomad"
      port     = "app"
    }
    // task is the same
  }

  group "redis" {
    count = 1

    network {
      mode = "host"
      port "redis" {
        to = 6379
      }
    }

    service {
      name     = "redis"
      provider = "nomad"
      port     = "redis"
    }
    // task is the same
  }
So, we added a new service block and got rid of static ports. Well, there’s no need to bind to static ports when we’re using service discovery.
After submitting the job, we can use the nomad service list command to ensure the services are registered with Nomad.
nomad service list
Service Name  Tags
app           []
redis         []
To find out details about a particular service, we can use nomad service info:
$ nomad service info app
Job ID  Address          Tags  Node ID   Alloc ID
hello   127.0.0.1:29948  []    d92224a5  5f2ac51f
$ nomad service info redis
Job ID  Address          Tags  Node ID   Alloc ID
hello   127.0.0.1:22300  []    d92224a5  8078c9a6
Perfect! We can see the dynamic port assignment in each of the services. To use this config in our app, we will template it:
    task "app" {
      driver = "docker"

      template {
        data = <<EOH
{{ range nomadService "redis" }}
DEMO_REDIS_ADDR={{ .Address }}:{{ .Port }}
{{ end }}
EOH

        destination = "secrets/config.env"
        env         = true
      }

      config {
        image = "mrkaran/hello-app:1.0.0"
        ports = ["app"]
      }

      resources {
        cores  = 1
        memory = 512
      }
    }
We added the template stanza which will interpolate the env variables in the container. We loop over nomadService and get the address and port of the redis service. This makes it convenient for tasks on other nodes to discover each other.
Using Consul Service Discovery#
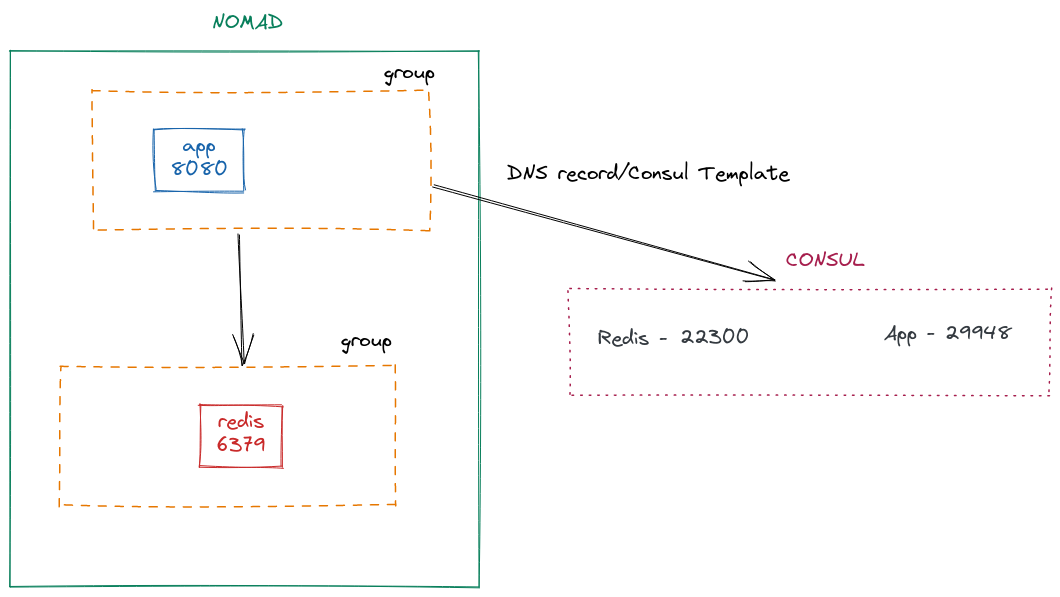
Just by tweaking provider in our service block, we can use the Consul agent for service discovery.
    service {
      name     = "app"
      provider = "consul"
      port     = "app"
    }


    task "app" {
      driver = "docker"

      template {
        data = <<EOH
{{ range service "redis" }}
DEMO_REDIS_ADDR={{ .Address }}:{{ .Port }}
{{ end }}
EOH
Ensure that you're running Consul and have connected Nomad to it. Please refer to docs for the same.
Since now we are using consul for registering services, we have to loop over service instead of nomadService. The rest of the things remain pretty much the same. I really like how with just 2 lines of code you can switch between Nomad/Consul for discovering services.
Now, of course, there are certain advantages to using Consul:
- You can query the address of the service with DNS:
doggo redis.service.consul @tcp://127.0.0.1:8600
NAME                    TYPE    CLASS   TTL ADDRESS     NAMESERVER
redis.service.consul. A IN 0s 172.20.10.3 127.0.0.1:8600 - Define health checks. Since it’s a new feature, health checks on Nomad service aren’t there but there’s a GitHub issue open for the same.
Update (2024): Native health checks are now available in Nomad since version 1.4 (released October 2022). This means you can define health checks directly in your Nomad service definitions without requiring Consul. You can read more about this in the Nomad documentation.
- Accessible by applications outside Nomad. In case
consulis used by other applications outside of the Nomad cluster, they can still get their address (using DNS or REST APIs)
However, Nomad native service discovery is perfect for local setups and even smaller use-cases in production because it eliminates the need of running Consul in your stack which is a big thing!
Scenario 4: Restricting access to certain namespaces#
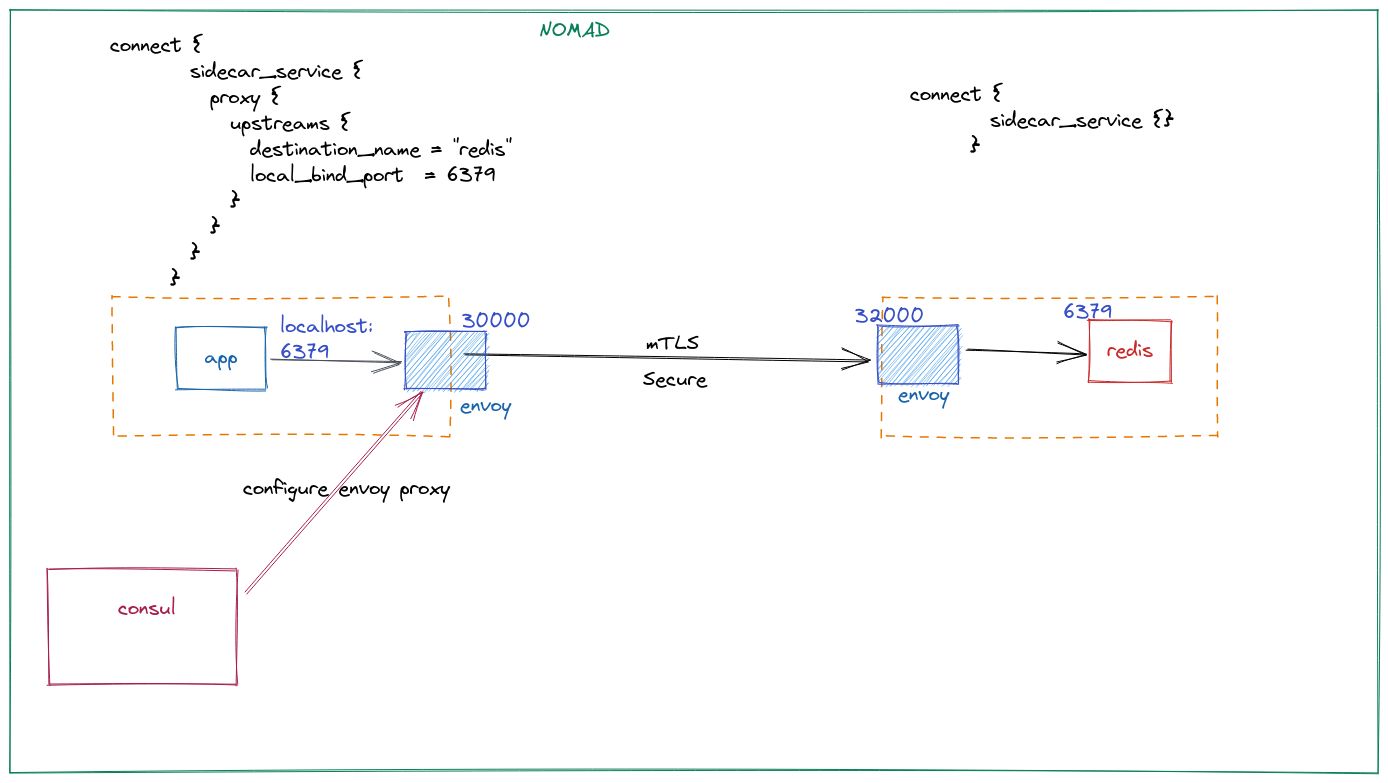
In all the above scenarios, we found that the service gets exposed to the local Nomad client. In case you’re running multiple namespaces on your cluster, you’d like to not expose them at all. In addition, you may want to express fine-grained controls on which application can access a particular service. All of this is possible via a Service Mesh. Nomad provides a way to have a “service mesh” via Consul Connect. Consul Connect can do mTLS and service authorization. Under the hood, it’s an Envoy proxy that runs alongside your app (sidecar is a fancy way to say that). The consul agent configures an Envoy configuration for you so it’s all pretty seamless.
For this to work, the first thing we need is a bridge network mode. This network model is actually a CNI plugin and needs to be installed separately in /opt/cni/bin. Follow the steps mentioned here.
    network {
      mode = "bridge"
      port "redis" {
        to = 6379
      }
    }
The service in redis is called as a Consul Connect Ingress:
    service {
      name     = "redis"
      provider = "consul"
      port     = "6379"
      connect {
        sidecar_service {}
      }
    }
It’s an empty block because we don’t need to define any upstream here. The rest of the values will be default values.
Next, we create a service for our app and that is a Consul Connect Egress:
    service {
      name     = "app"
      provider = "consul"
      port     = "app"
      connect {
        sidecar_service {
          proxy {
            upstreams {
              destination_name = "redis"
              local_bind_port  = 6379
            }
          }
        }
      }
    }
Here we define an upstream for redis. If you notice closely, we are using a port number in Consul Connect Ingress. For some reason, if you use a named port instead of 6379 it doesn’t work. I am not entirely sure if it’s a bug or it’s intended to work like this.
So here, when the app wants to talk to redis, it talks to localhost:6379 which is the local port that the Envoy sidecar is listening to. We can verify that using netstat:
$ netstat -tulpvn
Active Internet connections (only servers)
Proto Recv-Q Send-Q Local Address           Foreign Address         State       PID/Program name
tcp        0      0 127.0.0.2:19001         0.0.0.0:*               LISTEN      -
tcp        0      0 0.0.0.0:23237           0.0.0.0:*               LISTEN      -
tcp        0      0 127.0.0.1:6379          0.0.0.0:*               LISTEN      -
tcp6       0      0 :::8080                 :::*                    LISTEN      1/./hello.bin
The traffic is sent from this port to the other Envoy proxy on a port that it advertises (and Consul automagically configured). That Envoy proxy further sends the traffic to the redis container on port 6379. The proxied traffic is securley encrypted via mTLS and authorized (via Consul Intentions - not covered in this post).
Scenario 5: Exposing services to end-user#
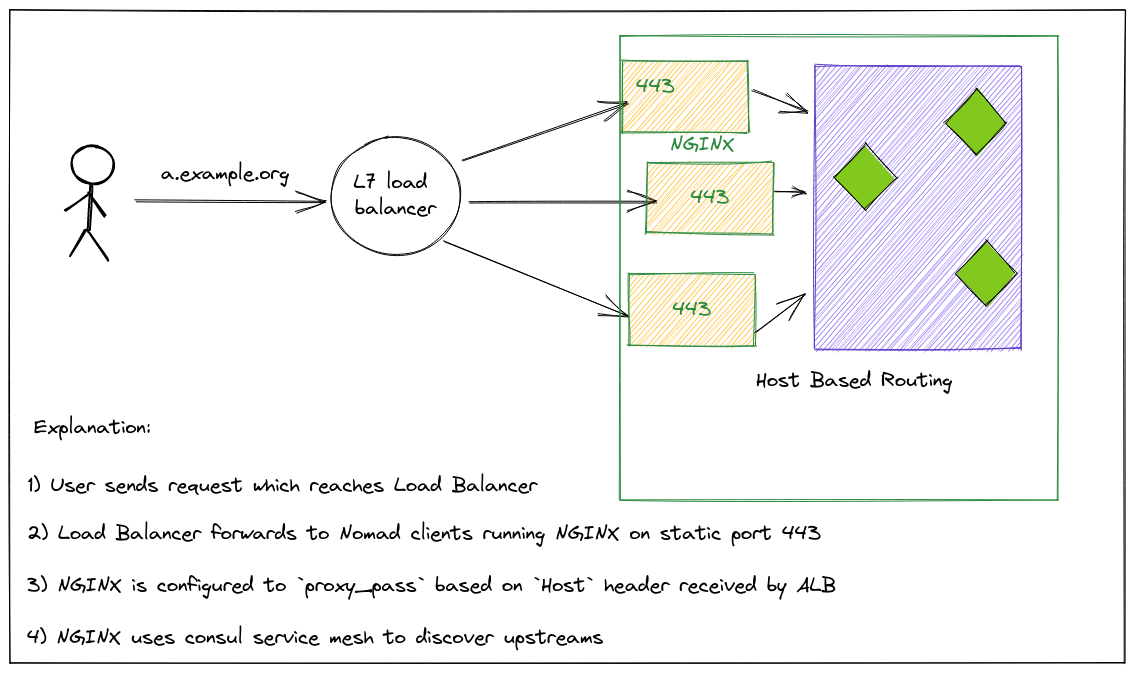
In the first scenario, we discussed using static ports. Well, it turns out it’s super helpful if you want to define a Traffic Ingress service. Unlike K8s, Nomad doesn’t have any Ingress Controllers, so the best way is to deploy these web proxies on each node as a system job (which means it’s ensured to run on every client node) and bind them to a static port (say 443/80). Then, configure your Load Balancers and register all the Nomad nodes as target IPs and their ports would be the static port you define. These Ingress proxies (like HAProxy/Nginx) can then be used to talk to your application via any of the patterns we’ve mentioned above.
Typically, you’d want to use a “Host-Based” routing pattern for your ingress proxy to make a routing decision.
For eg, in case you have an a.example.org DNS record pointing to an ALB. Now, when the request comes to the ALB, it forwards to any one of the NGINX/HAProxy. For HAProxy to correctly route the traffic to `a service, you can use a “Host” header.
Summary#
These were some of the common networking patterns that I’m aware of. Since some of these concepts are not really straightforward I hope the explanation helped in bringing some clarity.
There’s much more to this topic like Consul Gateways and multiple kind of CNIs which tweak how networking happens in the cluster but those are some really advanced topics that are out of the scope for this post.
Fin!